Research agents are multi-step AI agents that aim to provide in-depth answers to user queries. These agents differ from typical conversational agents, where we typically find fast response times and short AI answers.
There are several good reasons our conversational agents respond in the way they do. The first reason is that we aim to imitate the style of human conversation. A typical conversation between two people consists of short back-and-forths — it's rare (and often not wanted) that one of those people suddenly breaks out into a multi-page monologue.
Another typical quality of human conversations is a short wait time between responses. When someone says "hi," it would be odd to wait even a second before getting a response. We expect low-latency responses from people, and the same applies to our conversational AI agents.
Now, let's move away from conversational agents and consider what qualities we might want in a research agent. A longer, more researched, and cited response can be much more helpful if we ask a question in research or study. In this scenario, many might choose to delay their response by a few (or more) seconds if they're getting a more detailed response. In these scenarios, a user prefers to speak to a research agent rather than the typical conversational agent.
Because we have less time pressure with research agents, we can design them to work through a multi-step research pipeline and synthesize information from different places. Given a user's query, a research agent should be able to search the web, read papers, and access other relevant sources of information for its particular use case.
That doesn't mean a research agent cannot be conversational. In most cases, users prefer a conversational interface, and we can design agents that do both.
Graphs for Agents
Agents are still a relatively new concept. The modern form of agents, primarily LLM-powered, only became popular in early 2022, shortly after the release of ChatGPT.
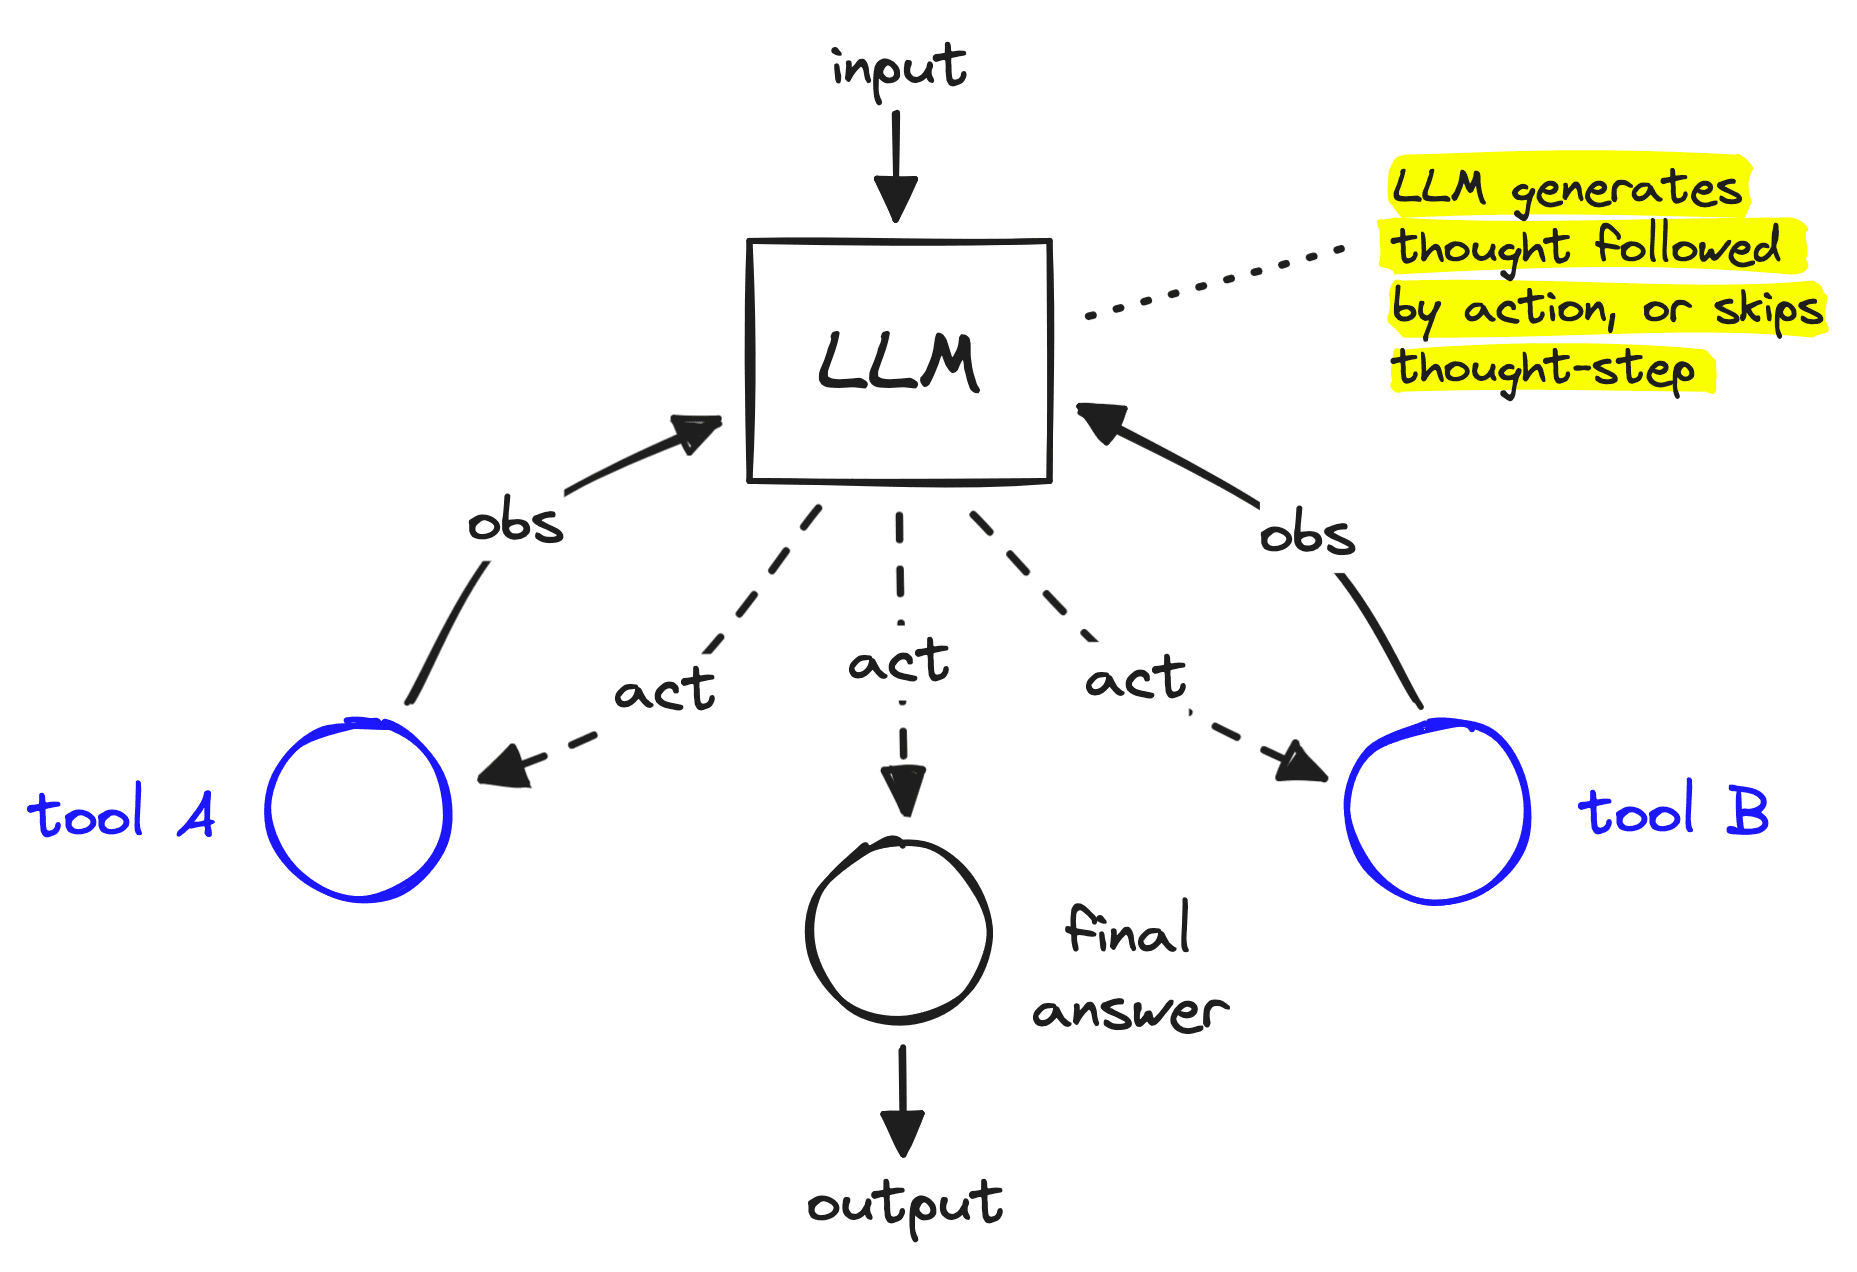
These earlier agents focused on providing an LLM with a decision-making framework allowing iterative decision-making and tool-use steps. The most popular of these being the Reason Action (ReAct) method [1].
ReAct encourages an LLM to generate steps broken into iterative reasoning and action steps. The reasoning step encourages the LLM to outline what steps it needs to take to answer a question. The agent then follows up with an action where our tool/function call executes a step like searching the internet.
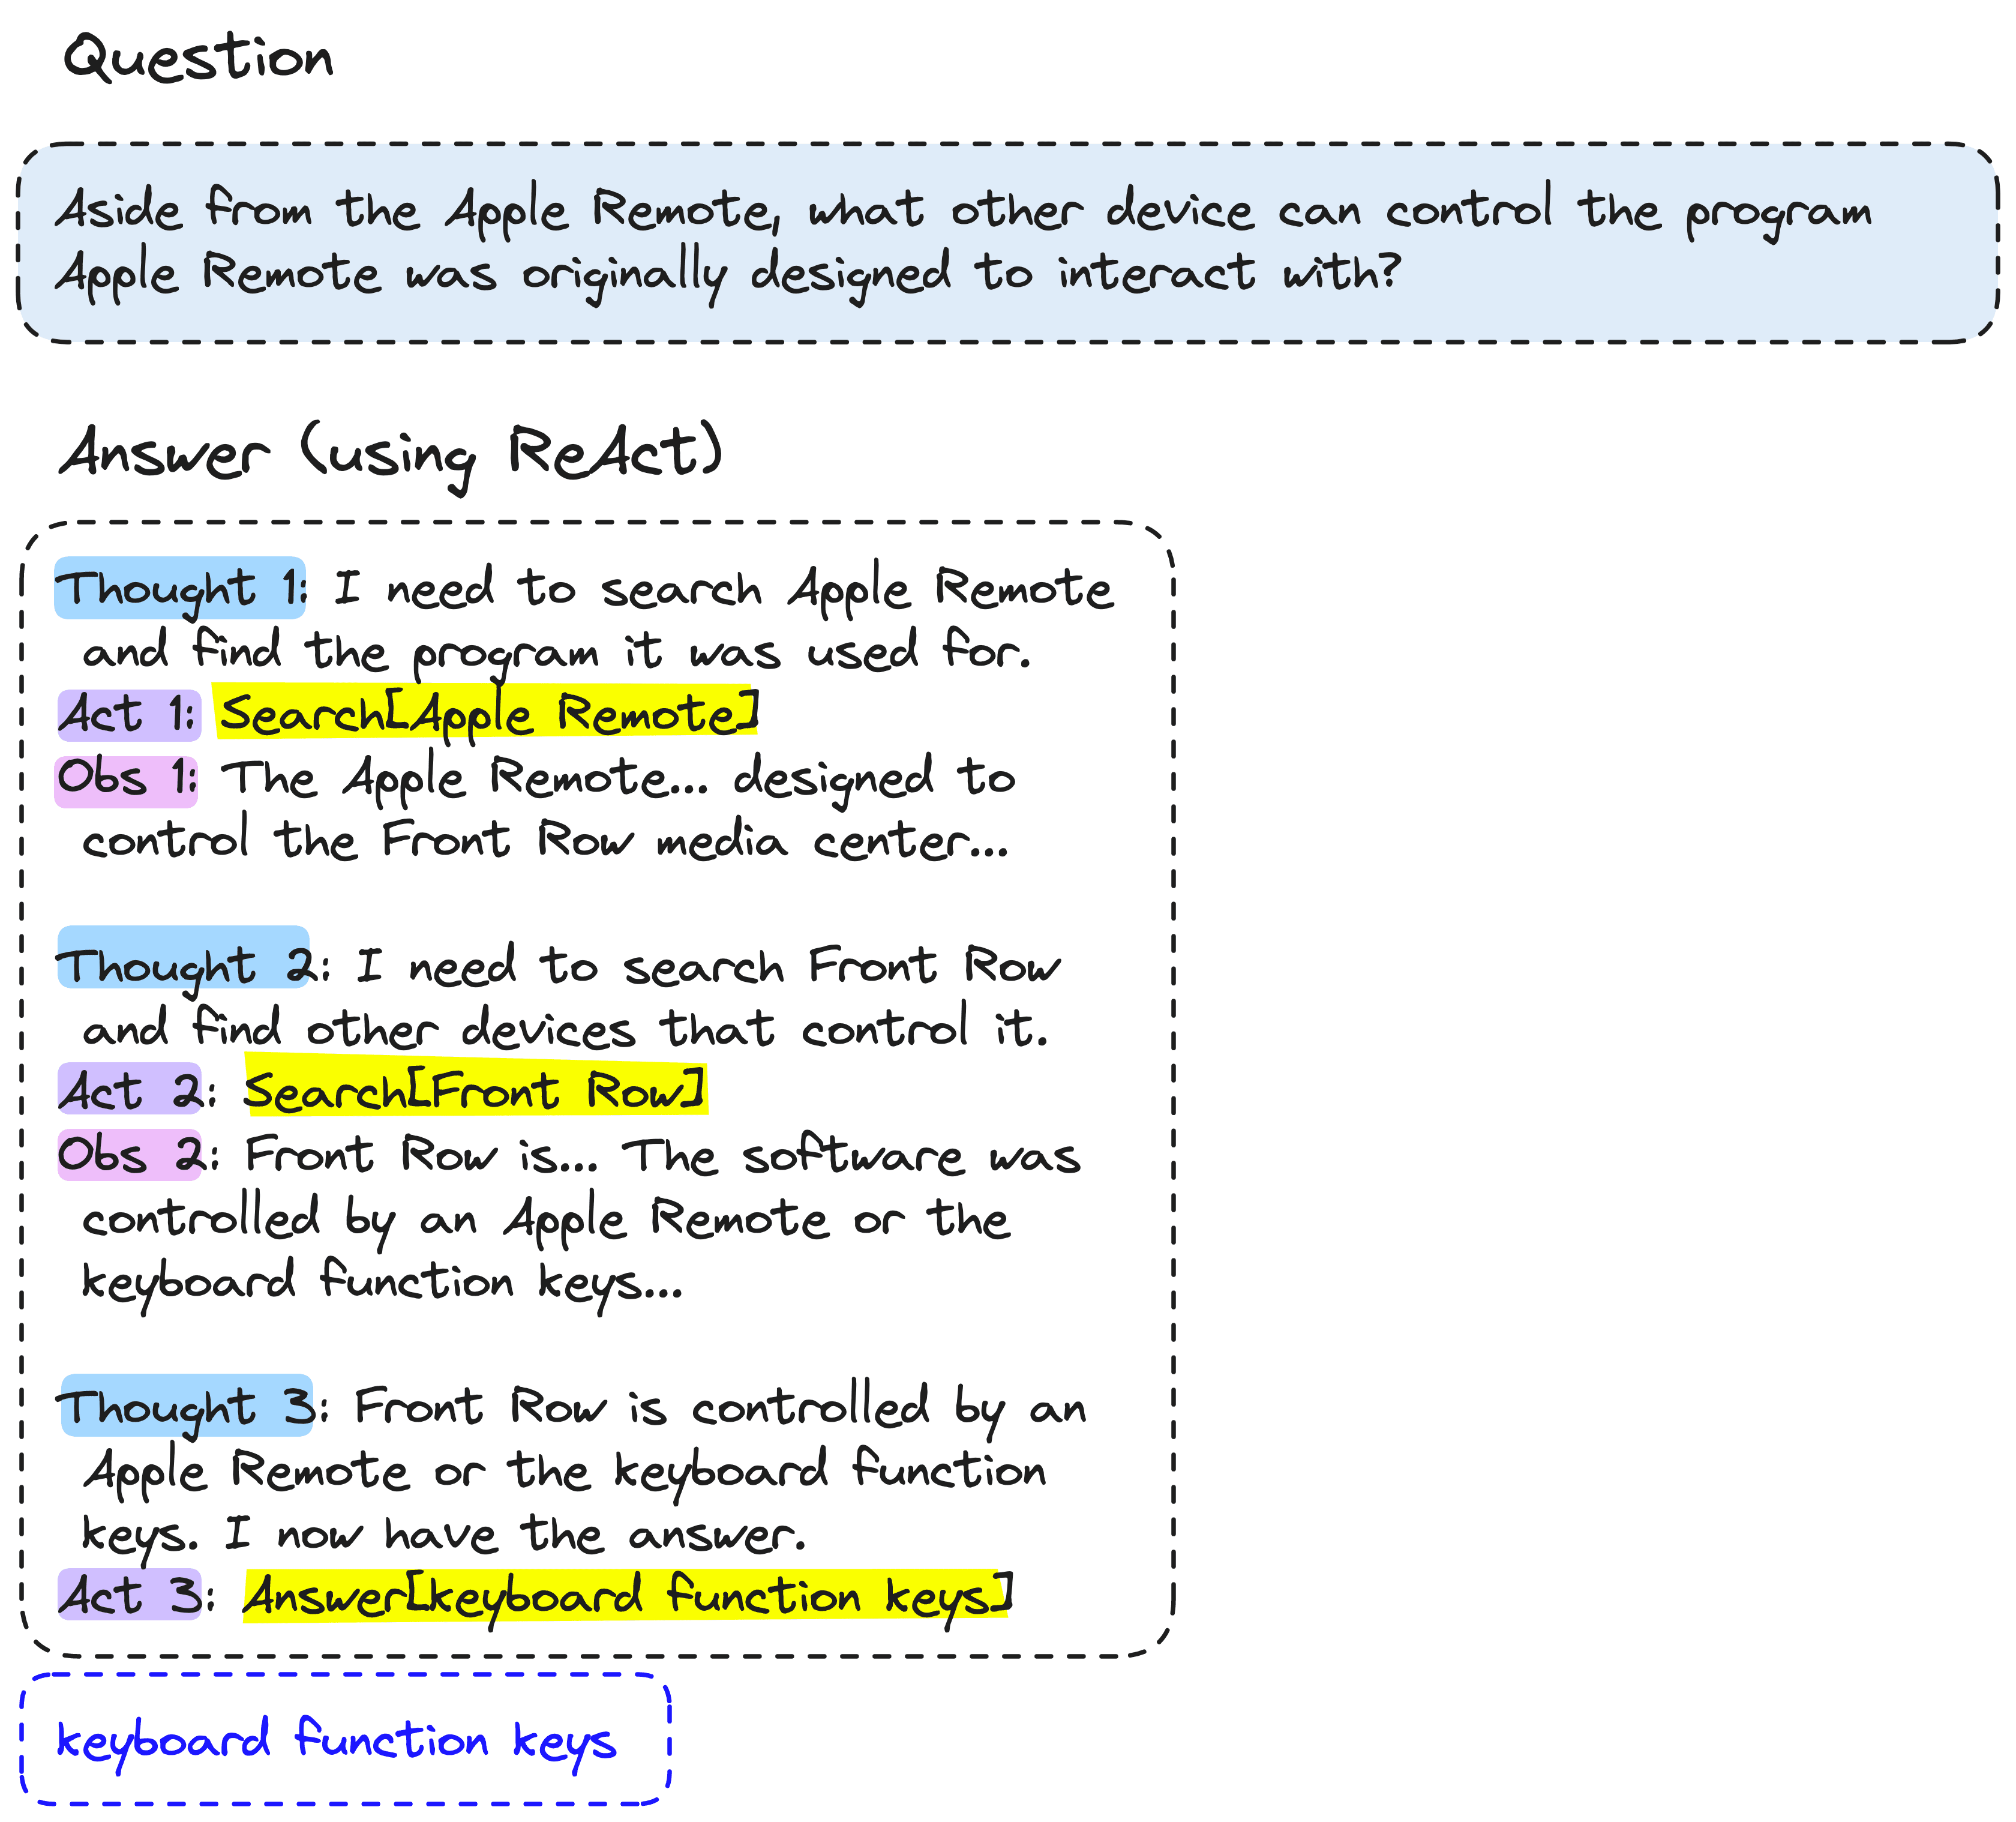
After these two steps, the agent receives an observation, i.e., the result of our action step. This reasoning-action loop can be repeated with various actions, all culminating in a final answer.
The ReAct framework is powerful because it allows us to combine LLMs with a wide range of data sources and executable programs.
Popular implementations of ReAct (or a similar method called "MRKL") made their way to libraries like LangChain, Llama-Index, and Haystack. These implementations allowed us to built ReAct-like agents using an object oriented approach.
The object-oriented approach functions well but leaves little flexibility or transparency in our agent. It's very possible to use ReAct agents via LangChain and have no idea how any of it is functioning, given the framework's abstractions.
An interesting solution to this is to construct agents as graphs. When building an agent as a graph, you can still produce the iterative ReAct-like loop, but it is much easier to customize that loop. We can add more deterministic flows and hierarchical decision-making and simply build with more flexibility and transparency.
More deterministic flows in our agent allow us to address two key limitations of ReAct-like agents: interpretability and entropy.
The interpretability of LLMs can often be hard to understand or measure. LLMs lack hard-coded rules, in contrast to traditional software which is very interpretable as it is constructed solely from hard-coded rules. This lack of deterministic behavior in LLMs is both a blessing and a curse. They can generate a seemingly infinite number of outputs, resulting in seemingly infinite potential — but those outputs are hard to engineer and impossible to fully predict.
To deploy LLM-based software into the world, we need confidence that it will behave a certain way. However, LLMs are compressed representations of an entire world, making it impossible (for now) to predict every possible output of an LLM.
Because of the lack of interpretability, LLM-based software needs as much determinstic logic as possible. Anything that does not require an LLM, should not use an LLM.
Entropy is the tendency of a system to become more chaotic over time.When executed iteratively without human guidance, an LLM can hallucinate or simply struggle to keep track of an increasingly long set of prior thoughts, actions, and observations. Due to this, LLMs typically become increasingly divergent from their original purpose as the number of iterative generations increases.
LangGraph
LangGraph is LangChain's graph-based agent framework and one of the most popular frameworks for building graph-based agents. It focuses on providing more "fine-grained" control over an agent's flow and state.
State
At the core of a graph in LangGraph is the agent state. The state is a mutable object where we track the current state of the agent execution as we pass through the graph. We can include different parameters within the state, in our research agent we will use a minimal example containing three parameters:
- input: This is the user's most recent query. Usually, this is a question that we want to answer with our research agent.
- chat_history: We are building a conversational agent that can support multiple interactions. To allow previous interactions to provide additional context throughout our agent logic, we include the chat history in the agent state.
- intermediate_steps provides a record of all steps the research agent will take between the user asking a question via input and the agent providing a final answer. These can include "search arxiv", "perform general purpose web search," etc. These intermediate steps are crucial to allowing the agent to follow a path of coherent actions and ultimately producing an informed final answer.
Follow Along with Code!
The remainder of this article will be focused on the implementation of a LangGraph research agent using Python. You can find a copy of the code here.
If following along, make sure to install prerequisite packages first:
!pip install -qU \
    datasets==2.19.1 \
    langchain-pinecone==0.1.1 \
    langchain-openai==0.1.9 \
    langchain==0.2.5 \
    langchain-core==0.2.9 \
    langgraph==0.1.1 \
    semantic-router==0.0.48 \
    serpapi==0.1.5 \
    google-search-results==2.4.2 \
We define our minimal agent state object like so:
from typing import TypedDict, Annotated
from langchain_core.agents import AgentAction
from langchain_core.messages import BaseMessage
import operator


class AgentState(TypedDict):
   input: str
   chat_history: list[BaseMessage]
   intermediate_steps: Annotated[list[tuple[AgentAction, str]], operator.add]
Creating our Tools
The agent graph consists of several nodes, five of which are custom tools we need to create. Those tools are:
- ArXiv paper fetch: Given an arXiv paper ID, this tool provides our agent with the paper's abstract.
- Web search: This tool provides our agent access to Google search for more generalized queries.
- RAG search: We will create a knowledge base containing AI arXiv papers. This tool provides our agent with access to this knowledge.
- RAG search with filter: Sometimes, our agent may need more information from a specific paper. This tool allows our agent to do just that.
- Final answer: We create a custom final answer tool that forces our agent to output information in a specific format like:
 INTRODUCTION
 ------------
 <some intro to our report>
  RESEARCH STEPS
 --------------
 <the steps the agent took during research>
  REPORT
 ------
 <the report main body>
  CONCLUSION
 ----------
 <the report conclusion>
  SOURCES
 -------
 <any sources the agent used>
We'll setup each of these tools, which our LLM and graph-logic will later be able to execute.
ArXiv Paper Fetch Tool
The fetch_arxiv tool will allow our agent to get the summary of a specific paper given an ArXiv paper ID. We will simply send a GET request to arXiv and use regex to extract the paper abstract. That GET request will return something like this:
from langchain_core.tools import tool


@tool("fetch_arxiv")
def fetch_arxiv(arxiv_id: str):
   """Gets the abstract from an ArXiv paper given the arxiv ID. Useful for
   finding high-level context about a specific paper."""
   # get paper page in html
   res = requests.get(
       f"https://export.arxiv.org/abs/{arxiv_id}"
   )
   # search html for abstract
   re_match = abstract_pattern.search(res.text)
   # return abstract text
return re_match.group(1)Web Search Tool
The web search tool will provide the agent with access to web search. We will instruct our LLM to use this for more general knowledge queries. To implement the search component of the tool, we will be using the SerpAPI. You can get a free API key for the service here. Once you have the API key we run a query for "coffee" like so:
@tool("web_search")
def web_search(query: str):
   """Finds general knowledge information using Google search. Can also be used
   to augment more 'general' knowledge to a previous specialist query."""
   search = GoogleSearch({
       **serpapi_params,
       "q": query,
       "num": 5
   })
   results = search.get_dict()["organic_results"]
   contexts = "\n---\n".join(
       ["\n".join([x["title"], x["snippet"], x["link"]]) for x in results]
   )
   return contexts
RAG Tools
We provide two RAG-focused tools for our agent. The rag_search allows the agent to perform a simple RAG search for some information across all indexed research papers. The rag_search_filter also searches, but within a specific paper filtered for via the arxiv_id parameter.
We also define the format_rag_contexts function to handle the transformation of our Pinecone results from a JSON object to a readble plaintext format. Note: you can find the code for setting up the index we use here.
def format_rag_contexts(matches: list):
   contexts = []
   for x in matches:
       text = (
           f"Title: {x['metadata']['title']}\n"
           f"Content: {x['metadata']['content']}\n"
           f"ArXiv ID: {x['metadata']['arxiv_id']}\n"
           f"Related Papers: {x['metadata']['references']}\n"
       )
       contexts.append(text)
   context_str = "\n---\n".join(contexts)
   return context_str


@tool("rag_search_filter")
def rag_search_filter(query: str, arxiv_id: str):
   """Finds information from our ArXiv database using a natural language query
   and a specific ArXiv ID. Allows us to learn more details about a specific paper."""
   xq = encoder([query])
   xc = index.query(vector=xq, top_k=6, include_metadata=True, filter={"arxiv_id": arxiv_id})
   context_str = format_rag_contexts(xc["matches"])
   return context_str


@tool("rag_search")
def rag_search(query: str):
   """Finds specialist information on AI using a natural language query."""
   xq = encoder([query])
   xc = index.query(vector=xq, top_k=2, include_metadata=True)
   context_str = format_rag_contexts(xc["matches"])
   return context_str
Final Answer "Tool"
Finally, we define a "final answer" tool. This tool isn't a tool in the usual sense, instead we use it to force a particular output format from our LLM via the function/tool calling.
@tool("final_answer")
def final_answer(
   introduction: str,
   research_steps: str,
   main_body: str,
   conclusion: str,
   sources: str
):
   """Returns a natural language response to the user in the form of a research
   report. There are several sections to this report, those are:
   - `introduction`: a short paragraph introducing the user's question and the
   topic we are researching.
   - `research_steps`: a few bullet points explaining the steps that were taken
   to research your report.
   - `main_body`: this is where the bulk of high quality and concise
   information that answers the user's question belongs. It is 3-4 paragraphs
   long in length.
   - `conclusion`: this is a short single paragraph conclusion providing a
   concise but sophisticated view on what was found.
   - `sources`: a bulletpoint list provided detailed sources for all information
   referenced during the research process
   """
   if type(research_steps) is list:
       research_steps = "\n".join([f"- {r}" for r in research_steps])
   if type(sources) is list:
       sources = "\n".join([f"- {s}" for s in sources])
   return ""
We have finished defining all our tools and can move onto our next components.
Defining the Oracle
The Oracle LLM is our graph's decision maker. It decides which path we should take down our graph. It functions similarly to an agent but is much simpler; consisting of a single prompt, LLM, and tool instructions. When executed the oracle will only run once before we move to another node in our graph.
The Oracle consists of an LLM provided with a set of potential function calls (i.e., our tools) that it can decide to use. We force it to use at least one of those tools using the tool_choice="any" setting (see below). Our Oracle only makes the decision to use a tool; it doesn't execute the tool code itself (we do that separately in our graph).
Our prompt for the Oracle will emphasize its decision-making ability within the system_prompt. We will also add a placeholder for us to later insert chat_history, and provide a place for us to insert the intermediate steps (scratchpad) and user input.
from langchain_core.prompts import ChatPromptTemplate, MessagesPlaceholder


system_prompt = """You are the oracle, the great AI decision maker.
Given the user's query you must decide what to do with it based on the
list of tools provided to you.


If you see that a tool has been used (in the scratchpad) with a particular
query, do NOT use that same tool with the same query again. Also, do NOT use
any tool more than twice (ie, if the tool appears in the scratchpad twice, do
not use it again).


You should aim to collect information from a diverse range of sources before
providing the answer to the user. Once you have collected plenty of information
to answer the user's question (stored in the scratchpad) use the final_answer
tool."""


prompt = ChatPromptTemplate.from_messages([
   ("system", system_prompt),
   MessagesPlaceholder(variable_name="chat_history"),
   ("user", "{input}"),
   ("assistant", "scratchpad: {scratchpad}"),
])
Next, we must initialize our llm (for this we use gpt-4o) and then create the runnable pipeline of our Oracle.
The runnable connects our inputs (the user input and chat_history) to our prompt, and our prompt to our llm. It is also where we bind our tools to the LLM and enforce function calling via tool_choice="any".
from langchain_core.messages import ToolCall, ToolMessage
from langchain_openai import ChatOpenAI


llm = ChatOpenAI(
   model="gpt-4o",
   openai_api_key=os.environ["OPENAI_API_KEY"],
   temperature=0
)


tools=[
   rag_search_filter,
   rag_search,
   fetch_arxiv,
   web_search,
   final_answer
]


# define a function to transform intermediate_steps from list
# of AgentAction to scratchpad string
def create_scratchpad(intermediate_steps: list[AgentAction]):
   research_steps = []
   for i, action in enumerate(intermediate_steps):
       if action.log != "TBD":
           # this was the ToolExecution
           research_steps.append(
               f"Tool: {action.tool}, input: {action.tool_input}\n"
               f"Output: {action.log}"
           )
   return "\n---\n".join(research_steps)


oracle = (
   {
       "input": lambda x: x["input"],
       "chat_history": lambda x: x["chat_history"],
       "scratchpad": lambda x: create_scratchpad(
           intermediate_steps=x["intermediate_steps"]
       ),
   }
   | prompt
   | llm.bind_tools(tools, tool_choice="any")
)
We can see now that our Oracle decided to use the web_search tool with a query of "interesting facts about dogs" — a good choice.
Preparing the Graph Components
Our graph needs functions that consume the AgentState we defined earlier, and output intermediate_steps. To do this, we wrap our oracle and tool functions to use the AgentState. We'll also define a router which will route our state to different tool nodes based on the output from our oracle. We get this value from the out.tool_calls[0]["name"] value.
from typing import TypedDict


def run_oracle(state: TypedDict):
   print("run_oracle")
   print(f"intermediate_steps: {state['intermediate_steps']}")
   out = oracle.invoke(state)
   tool_name = out.tool_calls[0]["name"]
   tool_args = out.tool_calls[0]["args"]
   action_out = AgentAction(
       tool=tool_name,
       tool_input=tool_args,
       log="TBD"
   )
   return {
       "intermediate_steps": [action_out]
   }


def router(state: TypedDict):
   # return the tool name to use
   if isinstance(state["intermediate_steps"], list):
       return state["intermediate_steps"][-1].tool
   else:
       # if we output bad format go to final answer
       print("Router invalid format")
return "final_answer"tool_str_to_func = {
"rag_search_filter": rag_search_filter,
"rag_search": rag_search,
"fetch_arxiv": fetch_arxiv,
"web_search": web_search,
"final_answer": final_answer
}
def run_tool(state: TypedDict):
# use this as helper function so we repeat less code
tool_name = state["intermediate_steps"][-1].tool
tool_args = state["intermediate_steps"][-1].tool_input
print(f"{tool_name}.invoke(input={tool_args})")
# run tool
out = tool_str_to_func[tool_name].invoke(input=tool_args)
action_out = AgentAction(
tool=tool_name,
tool_input=tool_args,
log=str(out)
)
return {"intermediate_steps": [action_out]}Constructing the Graph
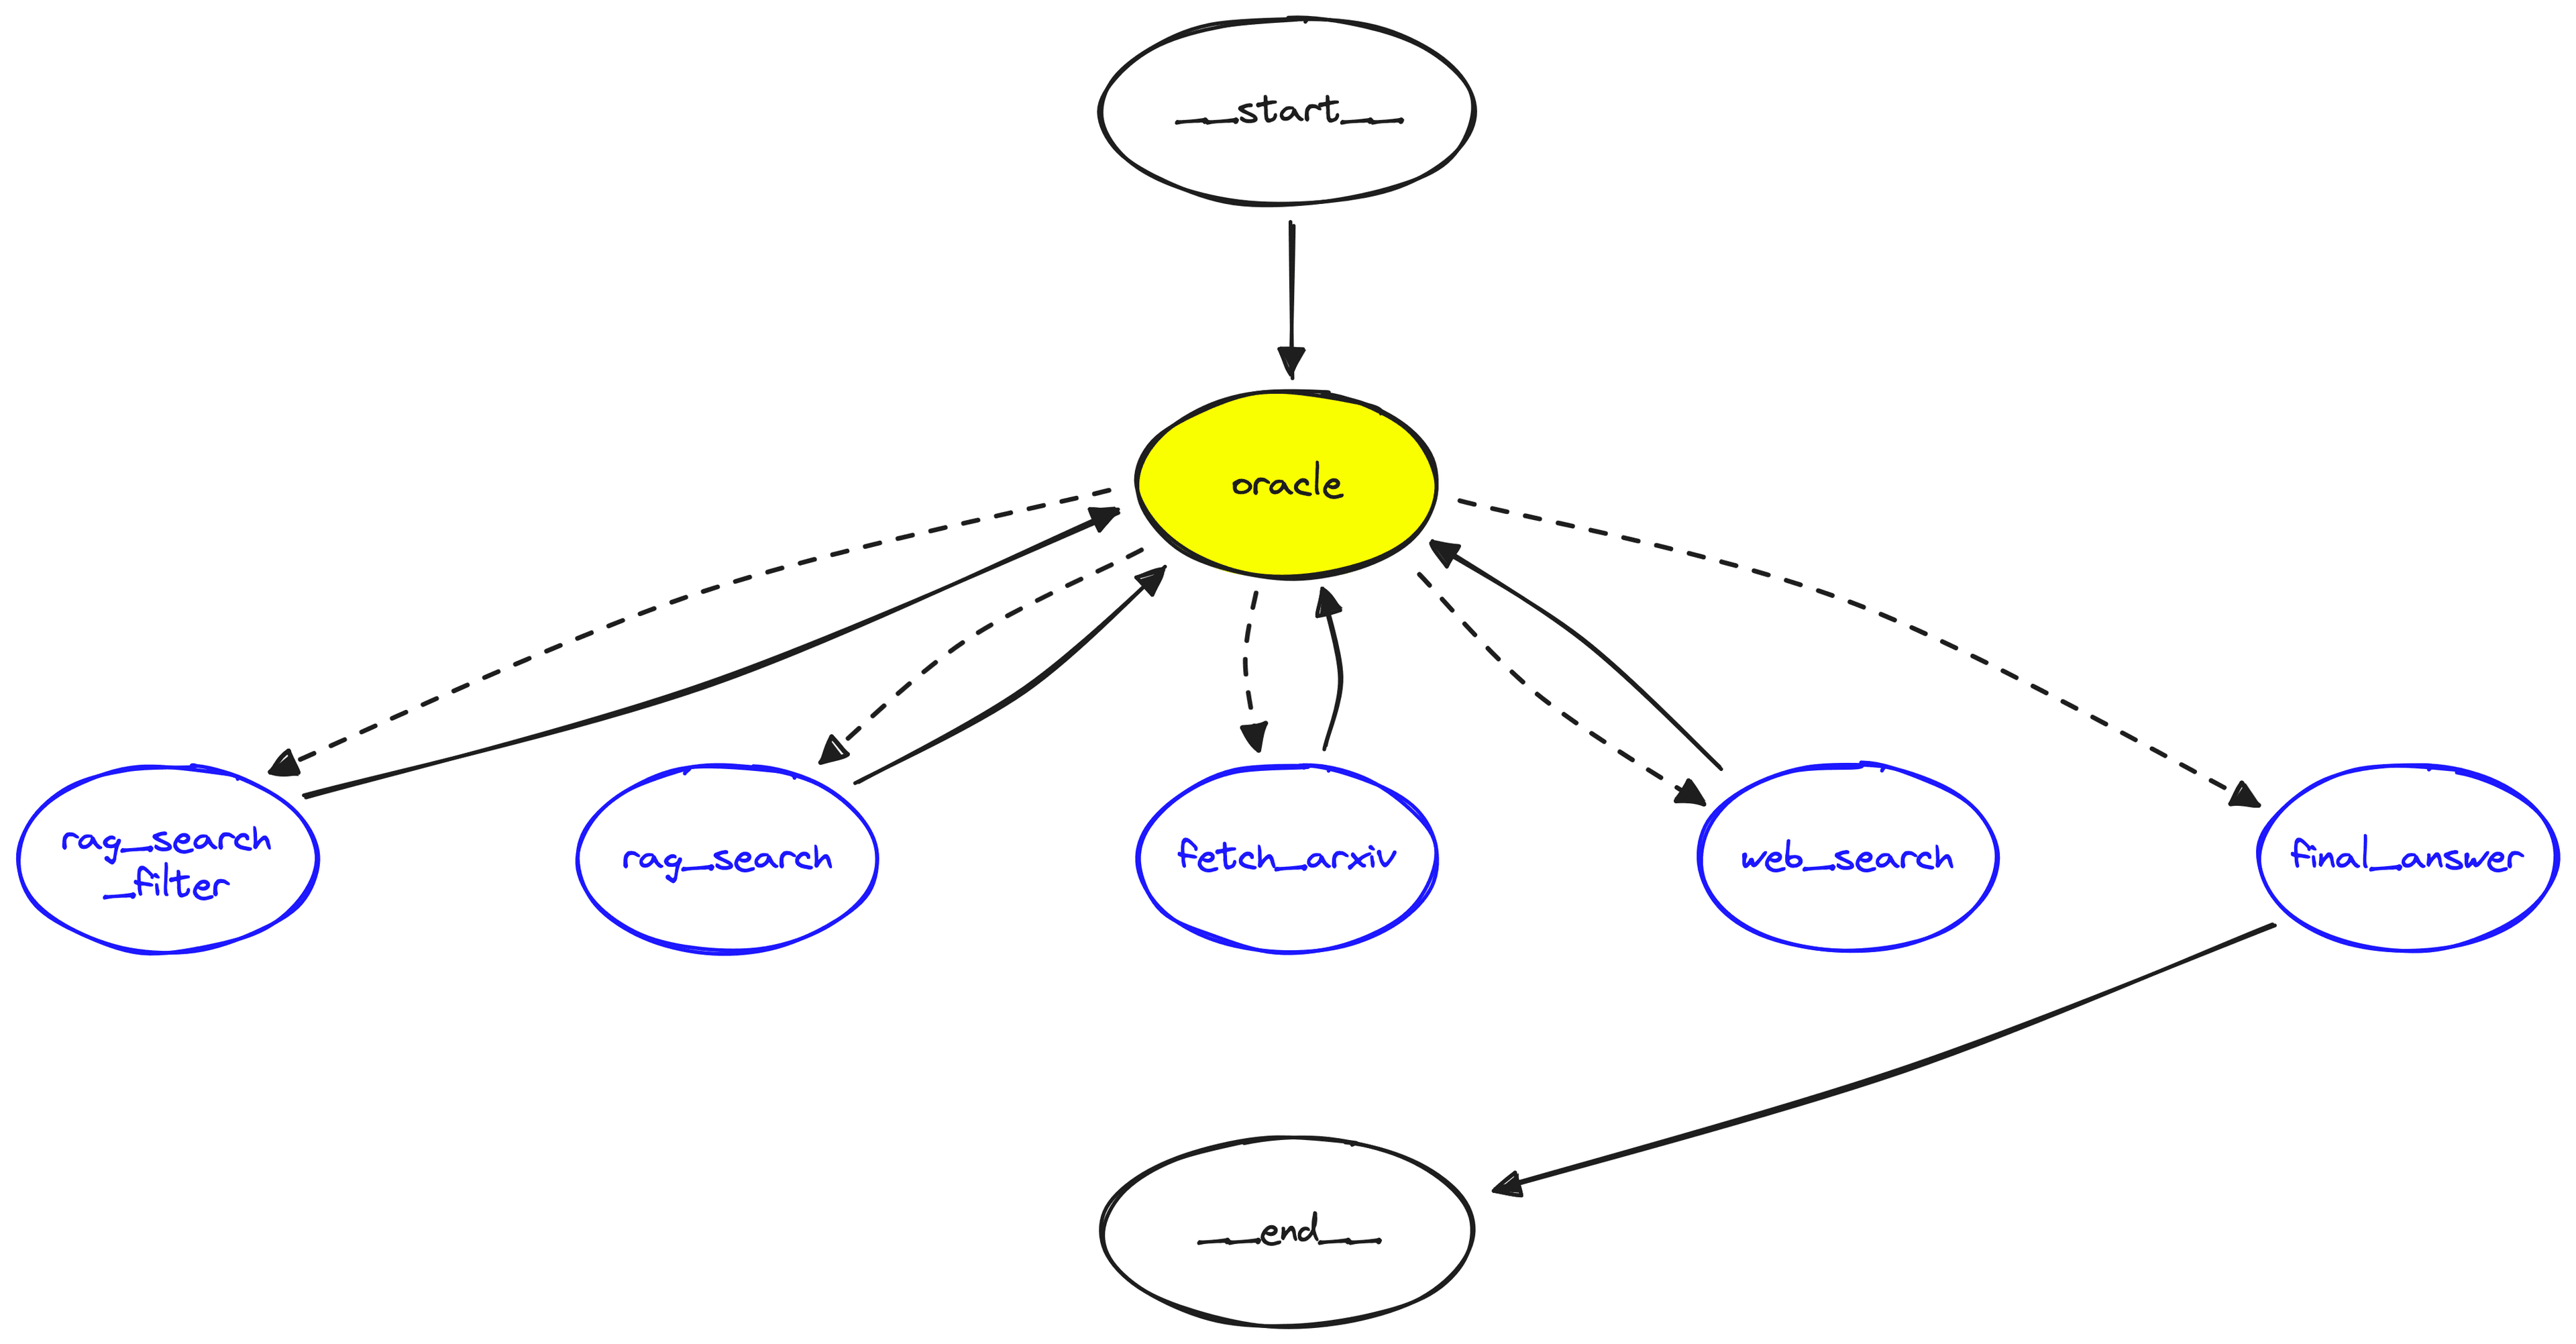
The graph in LangGraph consists of several components, we will be using the following:
- Nodes: these are the steps in the graph where we execute some logic. These could be an LLM call, tool execution, or our final answer output. We add them via graph.add_node(...).
- Edges: these are the connecting flows/paths in our graph. If we connect a node to another via an edge, we can move between those nodes. An edge only allows travel in a single direction, so from node A -> node B we would write graph.add_edge("node A", "node B") . However, we can allow bidirectional travel by adding a second edge from node B -> node A with graph.add_edge("node B", "node A").
- Entry point: this specifies the node from which we would enter the graph, i.e. our starting node. If starting at node A we write graph.set_entry_point("node A").
- Conditional edge: a conditional edge allows us to specify multiple potential edges from a source node to a set of destination nodes defined by a mapping passed to the path parameter. If adding conditional edges from node B to nodes C, D, and E — all decided using a router function (more on this later), we would write graph.add_conditional_edges(source="node A", path=router).
from langgraph.graph import StateGraph, END


# initialize the graph with our AgentState
graph = StateGraph(AgentState)


# add nodes
graph.add_node("oracle", run_oracle)
graph.add_node("rag_search_filter", run_tool)
graph.add_node("rag_search", run_tool)
graph.add_node("fetch_arxiv", run_tool)
graph.add_node("web_search", run_tool)
graph.add_node("final_answer", run_tool)


# specify the entry node
graph.set_entry_point("oracle")


# add the conditional edges which use the router
graph.add_conditional_edges(
   source="oracle",  # where in graph to start
   path=router,  # function to determine which node is called
)


# create edges from each tool back to the oracle
for tool_obj in tools:
   if tool_obj.name != "final_answer":
       graph.add_edge(tool_obj.name, "oracle")


# if anything goes to final answer, it must then move to END
graph.add_edge("final_answer", END)


# finally, we compile our graph
runnable = graph.compile()Building Research Reports
Our research agent is now ready, and we can begin testing it. First, we'll start with something simple that is out of our agent's scope but allows us to test it quickly.
def build_report(output: dict):
   research_steps = output["research_steps"]
   if type(research_steps) is list:
       research_steps = "\n".join([f"- {r}" for r in research_steps])
   sources = output["sources"]
   if type(sources) is list:
       sources = "\n".join([f"- {s}" for s in sources])
   return f"""
INTRODUCTION
------------
{output["introduction"]}


RESEARCH STEPS
--------------
{research_steps}


REPORT
------
{output["main_body"]}


CONCLUSION
----------
{output["conclusion"]}


SOURCES
-------
{sources}
"""There we go, we're seeing our research agent use multiple tools such as web search and arxiv search, synthesize all of the information it retrieves, and finally produce a mini-research report!
That's it for this article covering LangGraph and research agents. We've looked at the essentials behind conversational agents and research agents and where they share similarities and differences—particularly on the engineering front. We've discussed the idea behind graph-based agent frameworks and the additional visibility and flexibility they provide. Finally, we built our own research agent using LangGraph.
Graphs and agents are very promising concepts, and we expect pairing both to become an increasingly popular choice for engineers when building AI applications—particularly as AI becomes an increasingly critical component of reliable and trustworthy software.
References
[1] S. Yao, J. Zhao, D. Yu, N. Du, I. Shafran, K. Narasimhan, Y. Cao, ReAct: Synergizing Reasoning and Acting in Language Models (2023), ICLR
Was this article helpful?